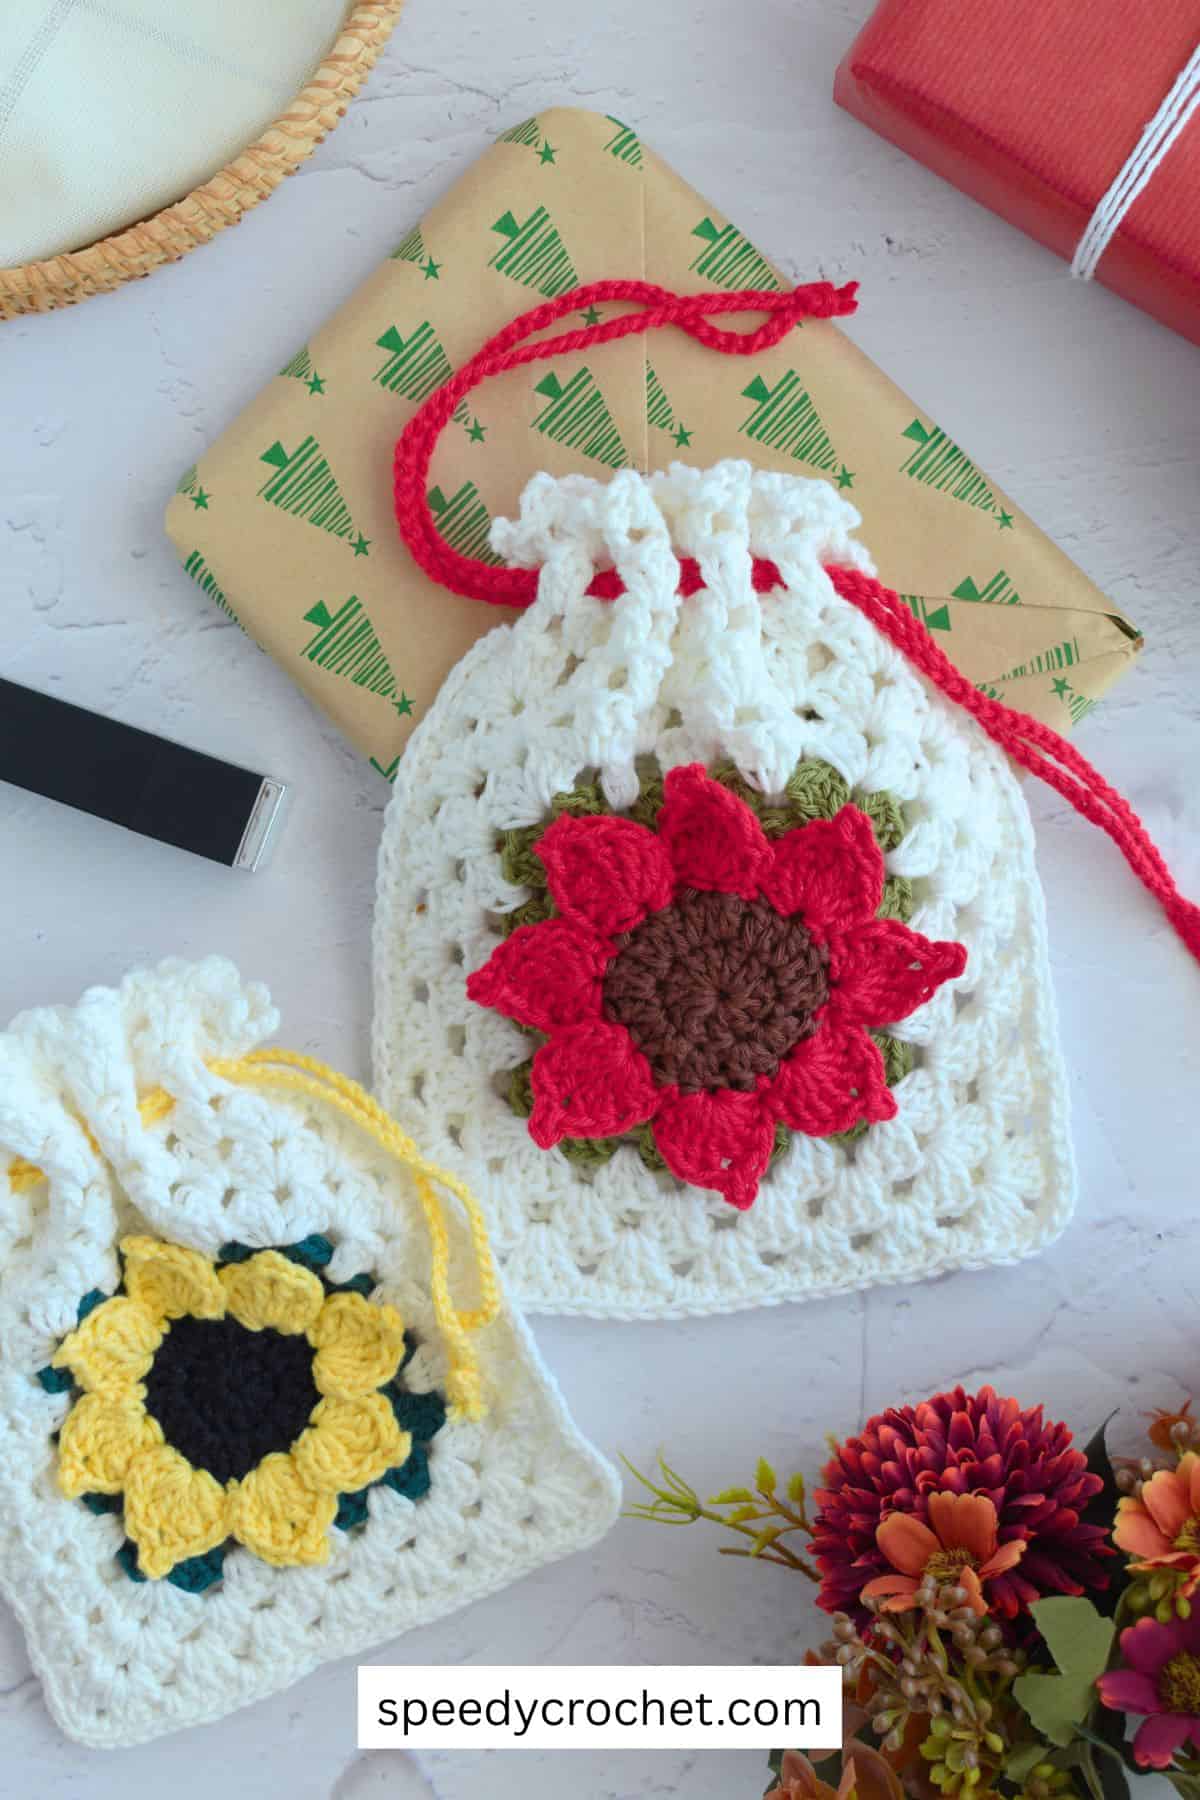
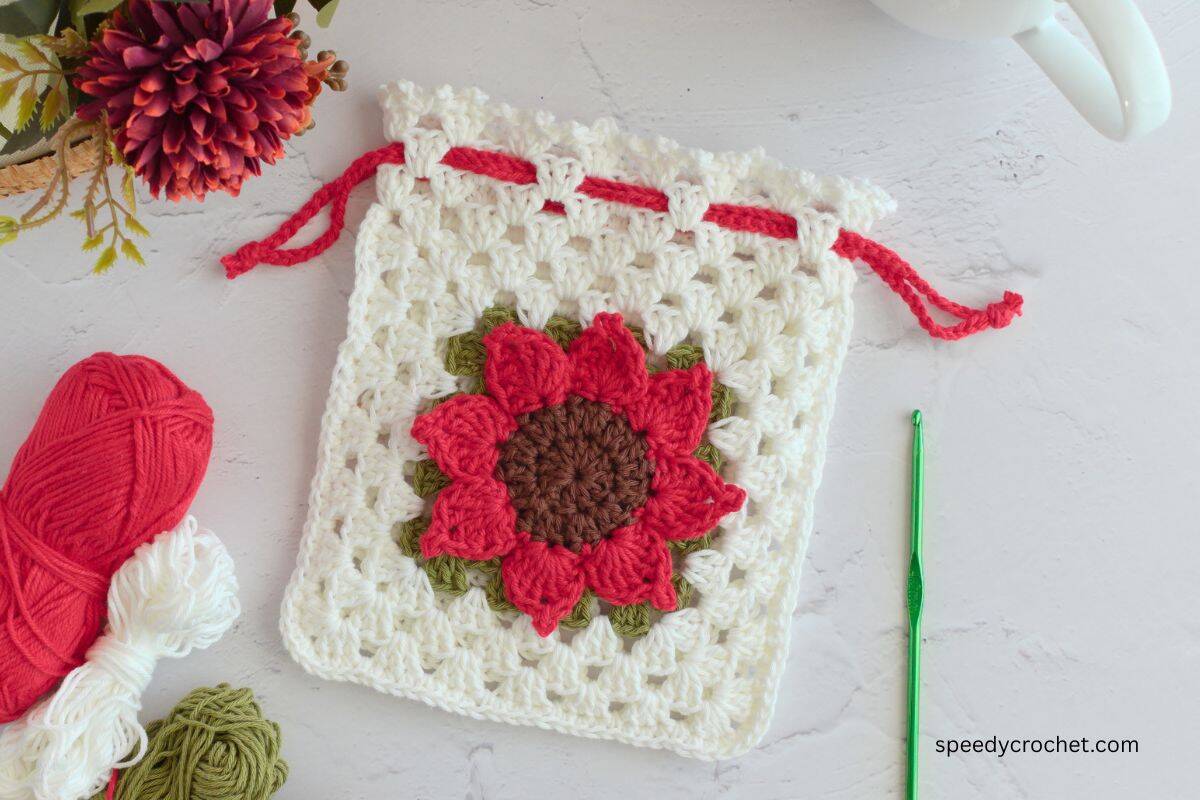
This sunflower crochet drawstring pouch is a cheerful, practical project that’s perfect for summer. Featuring a 3D sunflower front and a classic granny square back, this small crochet bag is both decorative and useful.
It’s a great easy afternoon project and a fun way to turn granny squares into something functional.
Looking for more projects you can finish in a day? Browse all same day crochet projects.
Table of contents
- Project Overview:
- Design Details
- Crochet Stitches
- Yarn and Hook Information
- Skill Level: Intermediate Beginner
- Perfect For Summer Gifts & Craft Fairs
- Materials
- Stitches and Abbreviations - US Terms
- Special Stitches
- Gauge & Finished Size
- Instructions For Small Crochet Sunflower Bag
- ✨ You're almost there! ✨
- More Easy Patterns
- What's Next?
- Comments
Project Overview:
- This pouch is made using #2 fine yarn and finished with a simple drawstring closure. The size is ideal for small items, gifts, or market makes.
- Skill level: Intermediate beginner
- Time: Easy afternoon project
- Finished size: 6 x 8 inches
Design Details
The front of the pouch features a raised 3D sunflower, adding texture and visual interest. The back uses a classic granny square, keeping the design balanced and familiar.
This combination makes the pouch eye-catching without being complicated.
Crochet Stitches
This pattern uses - chain stitch, slip stitch, single crochet, double crochet, treble stitch. You will also need to know how to make a magic ring.
Yarn and Hook Information
For this drawstring pouch pattern, we used #2 fine (sport, baby, 5ply) 100% cotton yarn with about 16 to 18 WPI (wraps per inch).
A 4 mm (G/6) was recommended for this yarn. However, we opted to use a smaller 3.5mm (E/4) hook to give a slightly tighter stitch. You can use other yarn weights and hook sizes but be aware that the size of the finished pouch will differ.
Skill Level: Intermediate Beginner
This crochet bag is suitable for intermediate beginners. Basic crochet skills are needed, along with some comfort working in the round and assembling pieces.
If you’ve made granny squares before and want to try a small bag, this is a great next step.
Perfect For Summer Gifts & Craft Fairs
This crochet sunflower pouch works well for many uses:
- Small gift bags
- Jewelry or keepsake pouch
- Party favors
- Craft fair items
- Summer accessories
Because this pouch is quick to make and easy to customize, it’s ideal for batching. Change colors to match seasons or themes, or keep the classic sunflower look for summer markets.
The drawstring closure keeps contents secure while adding a finished look.
Materials
Yarn
#2 fine (sport, baby, 5ply) 100% cotton yarn with about 16 to 18 WPI (wraps per inch)*
- Color A (center) dark brown – 2.7 yards (2.5 meters)
- Color B (petals) red - 20.7 yards (19 meters)
- Color C (border 1) green – 11 yards (10 meters)
- Color D (border 2) white - 91 yards (83 meters)
*Wraps per inch (WPI) - measures yarn thickness by counting how many times the yarn wraps around a ruler in one inch. More wraps thinner yarn, while fewer wraps thicker yarn.
Hook Size
- 4 mm
Notions
- Scissors
- Yarn Needle
Stitches and Abbreviations - US Terms
- ch- chain stitch
- col – color
- dc - double crochet
- hdc - half double crochet
- hk – hook
- MR - magic ring
- picot – picot – see below
- rnd – round
- rpt - repeat
- sc - single crochet
- sk – skip
- sl st - slip stitch
- sp/sps – space/spaces
- st/sts - stitch/stitches
- tr – treble stitch
- [ ] - at the end of a round indicates the number of stitches in that round
Special Stitches
- Picot - ch3, insert hk into 3rd ch from hk, YO pull the yarn back through both the stitch and the loop on the hk.
Gauge & Finished Size
Finished Size – about 6 inches (15cm) wide and 8 inches (20cm) tall
Gauge – not so important for this project.
Instructions For Small Crochet Sunflower Bag
Front
✨ You're almost there! ✨
To unlock the final steps and complete your pattern, create a free account with Grow.me. below.
Make sure to tick the box to subscribe to our newsletter and stay up to date with the latest patterns, tips, and more!
Once you're signed up, you'll get instant access to finish your project and enjoy exclusive content in the future.
Already signed up? Hit the button below and select ‘Switch to Log In’ to pick up where you left off and finish your project!
Foundation, col A - MR, or ch4, sl st into 1st ch to join.
Rnd 1 – ch3 (count as dc), 11dc in ring, sl st into top of 1st dc to join. [12dc]
Rnd 2 – ch3 (count as dc), 1dc in same sp as ch-3, 2dc in each of the 11-sts, sl st into top of 1st dc to join, ch1, cut yarn and fasten off. [24dc]
Rnd 3, col B - sl st new col into any st, ch2, (1dc, 2tr, picot, 2tr, 2dc) in same sp a ch-2, sk 1-st, 1sc in next, *(sc, ch2, 1dc, 2tr, picot, 2tr, 2dc) in next st, sk 1-st, 1sc in next st, rpt from * sl st into the base of the 1st ch-2 made. [8 petal groups, 8xsc]

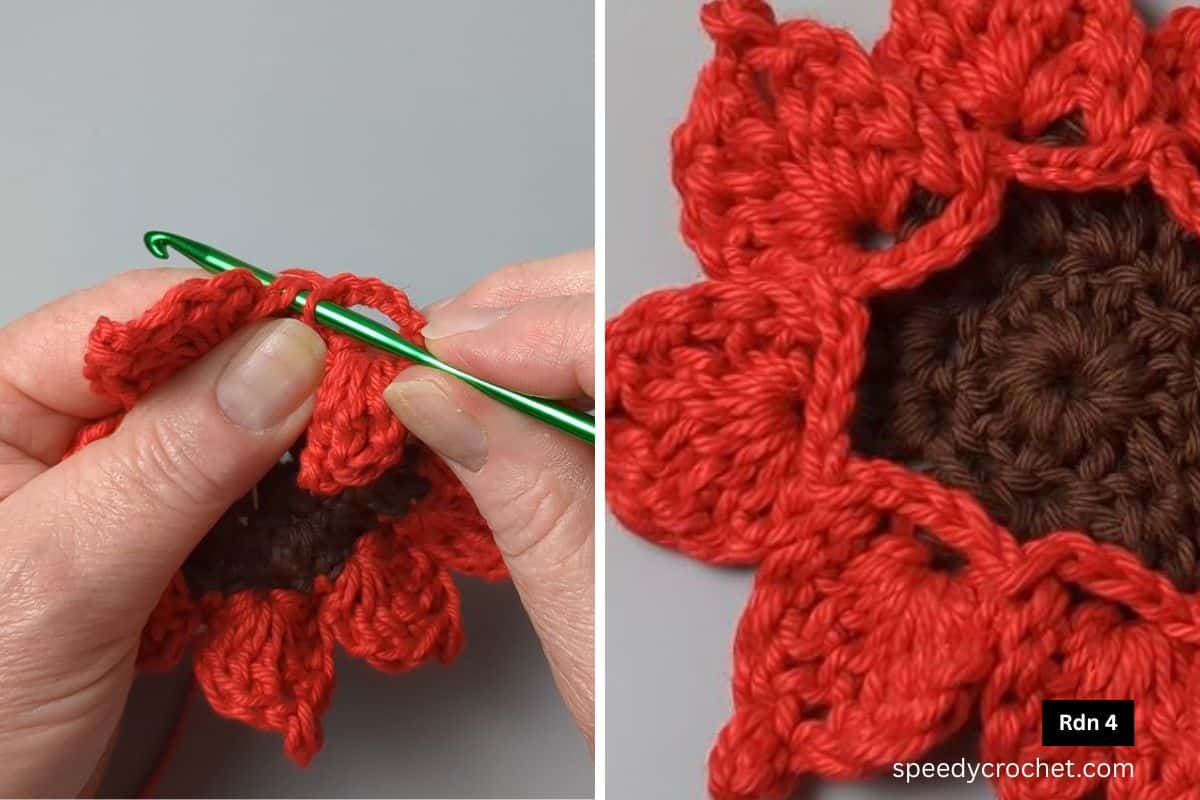
Rnd 4 - ch4 (runs at the back of petals), sl st into sc between next petal, ch4, * sl st in next sc, ch4, rpt from * 6 more times, sl st into base of 1st ch-4, ch1 cut yarn, fasten off, weave in ends. [8xch4]
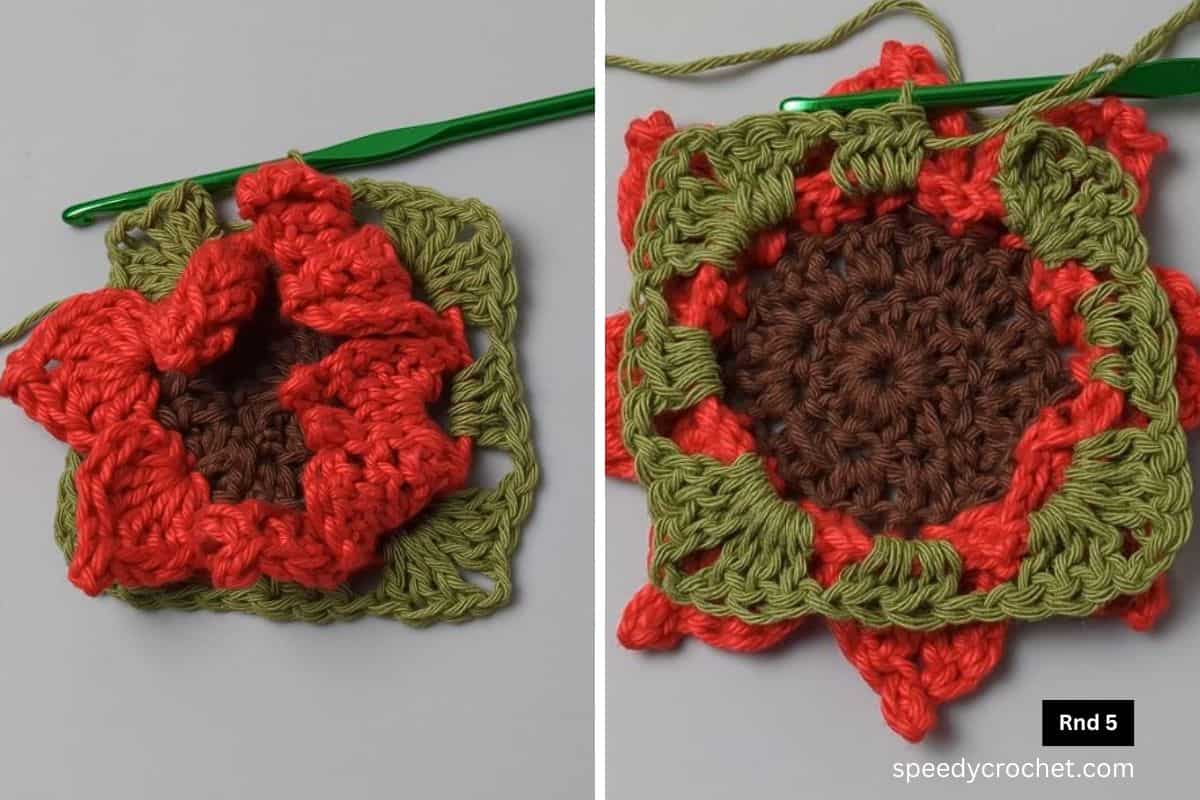
Rnd 5, col C - with the right side facing you, sl st into any ch-4 sp. (ch3 {counts as dc}, 2dc, ch2, 3dc, ch1) in ch-4 sp, (3hdc, ch1) in next ch-4 sp, * (3dc, ch2, 3dc,ch1) in next ch-4 sp, then (3hdc, ch1) in next sp, rpt from * 2 more times, sl st in top of ch3, to join. [36dc, 12xhdc, 4xch2, 8xch1]
Rnd 6 - sl st into the next 2-sts, sl st into ch-2 sp, ch3 (count as dc), 2dc, ch2, 3dc, ch1) in the ch-2 sp, (3dc, ch1) in the next 2 ch-1 sps * (3dc, ch2, 3dc, ch1) in ch-2 sp, (3dc, ch1) in the next 2 ch-1 sps, rpt from * 2 more times, sl st in top of ch-3 to join, ch1, cut yarn and fasten off, and weave in end. [48dc, 4xch2, 12xch1]
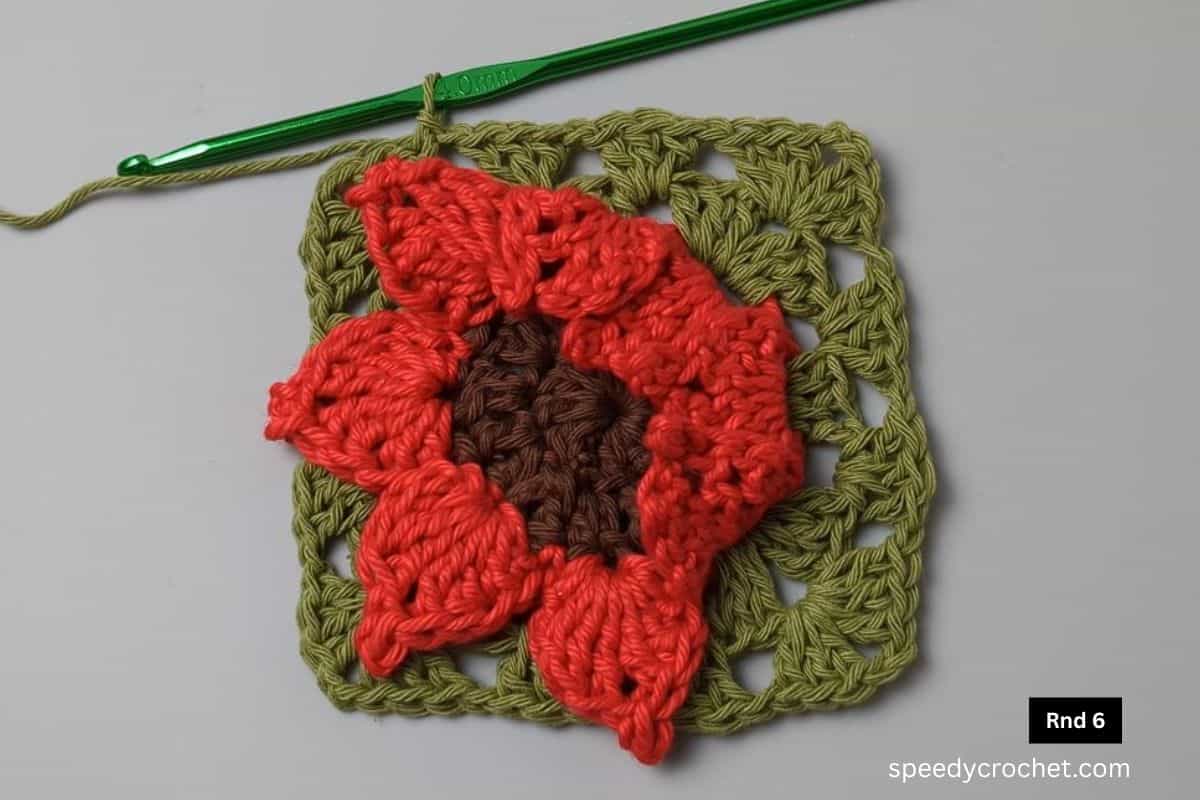
Rnd 7, col D - sl st new col into any ch-2 corner sp, ch3 (count as dc), (2dc, ch2, 3dc, ch1) in the ch-2 sp, (3dc, ch1) in each of the next 3 ch-1 sps, * (3dc, ch2, 3dc, ch1) in ch-2 sp, (3dc, ch1) in the next 3 ch-1 sps, rpt from * 2 more times, sl st in top of ch-3, to join. [60dc, 4xch2, 16xch1]
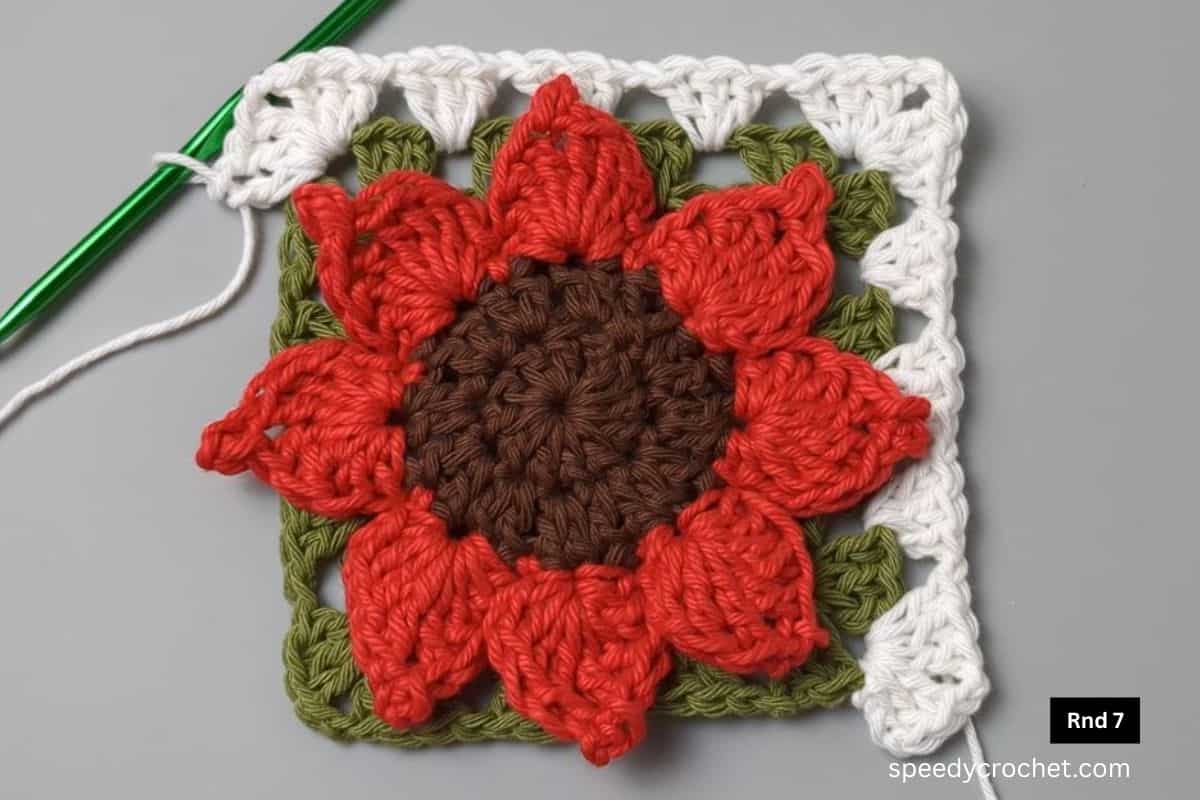
Rnd 8 - sl st into the next 2-sts, then sl st into ch-2 sp, ch3 (count as dc), (2dc, ch2, 3dc, ch1) in the ch-2 sp, (3dc, ch1) in each of the next 4 ch-1 sps, * (3dc, ch2, 3dc, ch1) in ch-2 sp, (3dc, ch1) in the next 4-sps, rpt from * 2 more times, sl st in top of ch-3, to join. [72dc, 4xch2, 20xch1]
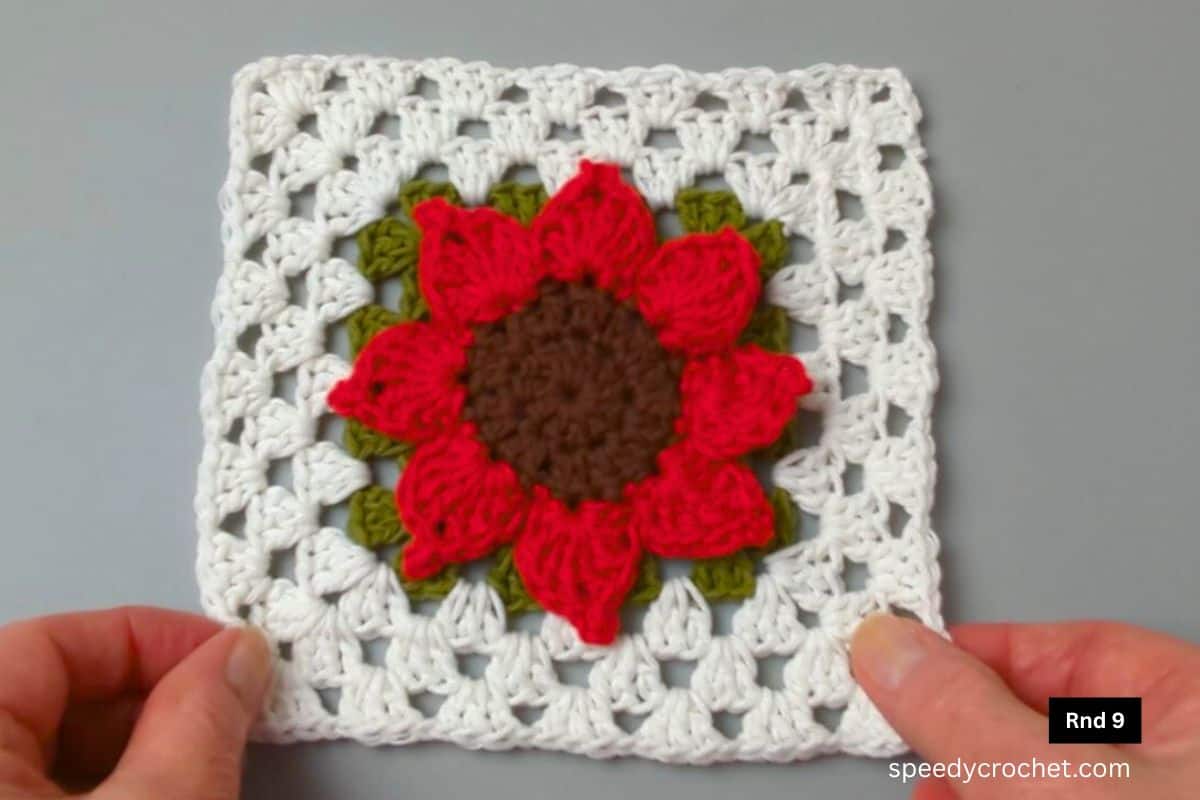
Rnd 9 - sl st into the next 2-sts, then sl st into ch-2 sp, ch3 (count as dc), (2dc, ch2, 3dc, ch1) in the ch-2 sp, (3dc, ch1) in each of the next 5 ch-1 sps, * (3dc, ch2, 3dc, ch1) in ch-2 sp, (3dc, ch1) in the next 5-sps, rpt from * 2 more times, sl st in top of ch-3, to join, cut yarn and fasten off, weave in end. [84dc, 4xch2, 24xch1]
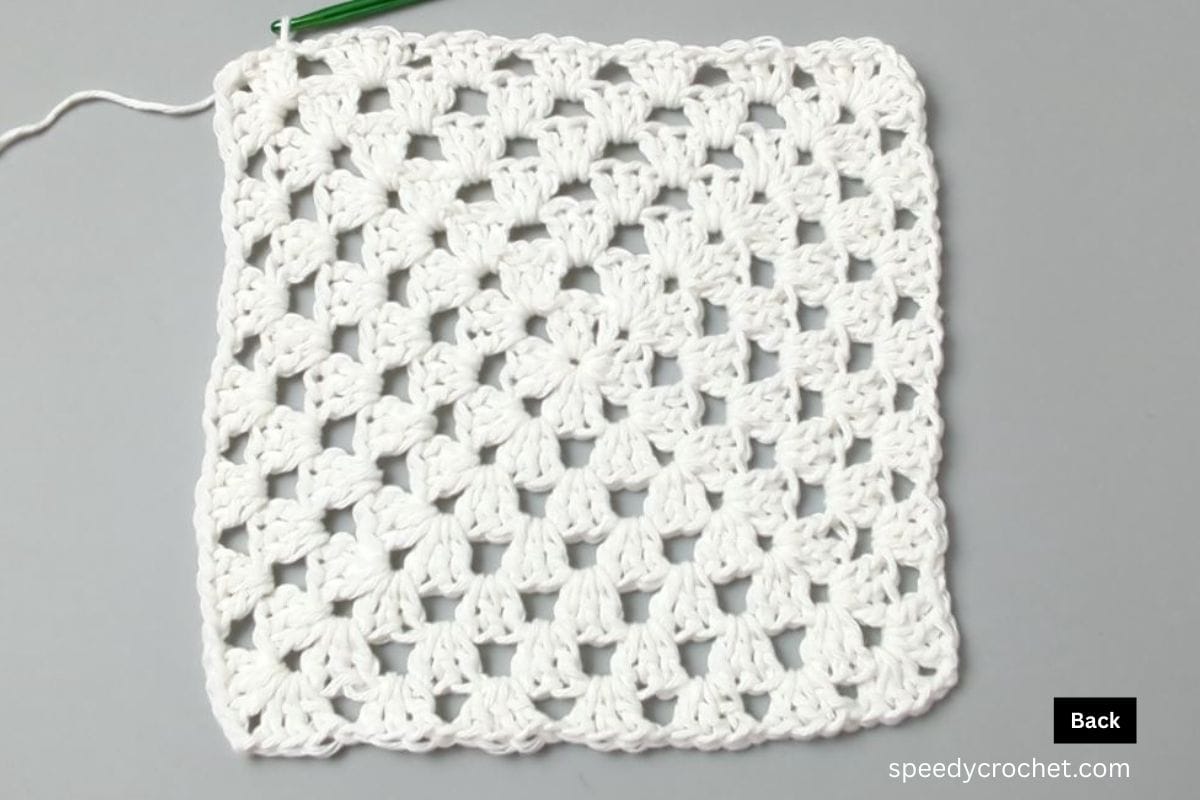
Back
Foundation, col D - ch4, sl st into 1st ch to join, or make a MR.
Rnd 1 - ch3 (counts as dc), (2dc, ch2) into ring, *(3dc, ch2) rpt from * 3 times, sl st in top of 1st ch-3, to join. [12dc, 4xch2]
Rnd 2 - sl st into the next 2-sts, sl st into ch-2 sp, ch3 (count as dc), (2dc, ch2, 3dc, ch1) in ch-2 sp, *(3dc, ch2, 3dc, ch1) in next ch-2 sp, rpt from * 2 more times, sl st in top of ch-3, to join. [24dc, 4xch2, 4xch1]
Rnd 3 - sl st into the next 2-sts, sl st into ch-2 sp, ch3 (count as dc), (2dc, ch2, 3dc, ch1) into ch-2 sp, (3dc, ch1) in next ch-1 sp, *(3dc, ch2, 3dc, ch1) in ch-2 sp, (3dc, ch1) in ch-1 sp, rpt from * 2 more times, sl st in top of ch-3 to join. [36dc, 4xch2, 8xch1]
Rnd 4 - sl st into the next 2-sts, sl st into ch-2 sp, ch3 (count as dc), (2dc, ch2, 3dc, ch1) into ch-2 sp, (3dc, ch1) in next 2 ch-1 sps, *(3dc, ch2, 3dc, ch1) in ch-2 sp, (3dc, ch1) in next 2 ch-1 sps, rpt from * 2 more times, sl st in top of ch-3 to join. [48dc, 4xch2, 12xch1]
Rnd 5 - sl st into the next 2-sts, sl st into ch-2 sp, ch3 (count as dc), (2dc, ch2, 3dc, ch1) into ch-2 sp, (3dc, ch1) in next 3 ch-1 sps, *(3dc, ch2, 3dc, ch1) in ch-2 sp, (3dc, ch1) in next 3 ch-1 sps, rpt from * 2 more times, sl st in top of ch-3 to join. [60dc, 4xch2, 16xch1]
Rnd 6 - sl st into the next 2-sts, sl st into ch-2 sp, ch3 (count as dc), (2dc, ch2, 3dc, ch1) into ch-2 sp, (3dc, ch1) in next 4 ch-1 sps, *(3dc, ch2, 3dc, ch1) in ch-2 sp, (3dc, ch1) in next 4 ch-1 sps, rpt from * 2 more times, sl st in top of ch-3 to join. [72dc, 4xch2, 20xch1]
Rnd 7 - sl st into the next 2-sts, sl st into ch-2 sp, ch3 (count as dc), (2dc, ch2, 3dc, ch1) into ch-2 sp, (3dc, ch1) in next 5 ch-1 sps, *(3dc, ch2, 3dc, ch1) in ch-2 sp, (3dc, ch1) in next 5 ch-1 sps, rpt from * 2 more times, sl st in top of ch-3 to join, sl st into next 2-sts, sl st into ch-2 sp, do not cut yarn. [84dc, 4xch2, 24xch1]
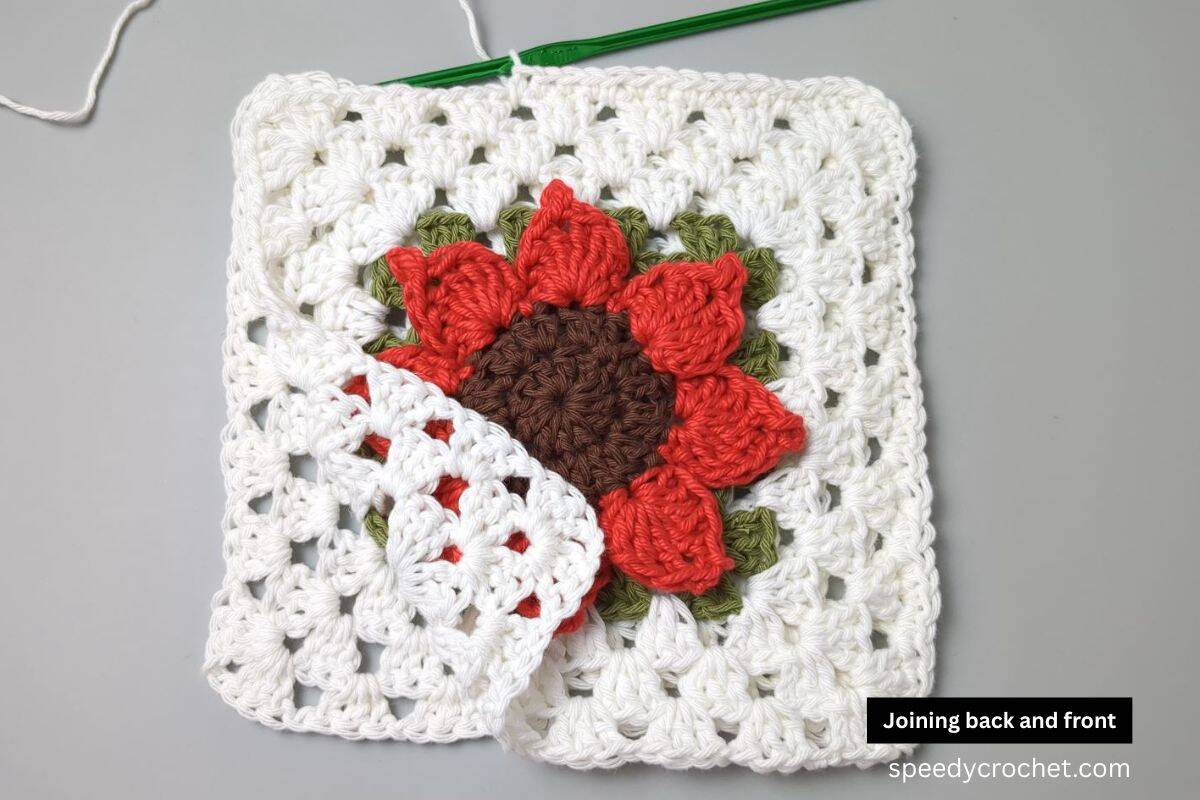
Joining Back And Front
With right sides facing out and sunflower side facing you, remove hk from loop, insert hk into the ch-2 sp (from the front to the back), insert hk back into loop and pull through to the front, ch1, 1sc in ch-2 sp, working through both layers to join, make 1sc in next 3-sts, *(**1sc in the ch-1 sp, 1sc in next 3-sts, rpt from ** 6 times, 2sc in ch-2 sp, 1sc in next 3-sts), rpt from * 2 more times, 1sc in ch-2 sp, you should now have closed three sides. Do not cut yarn.
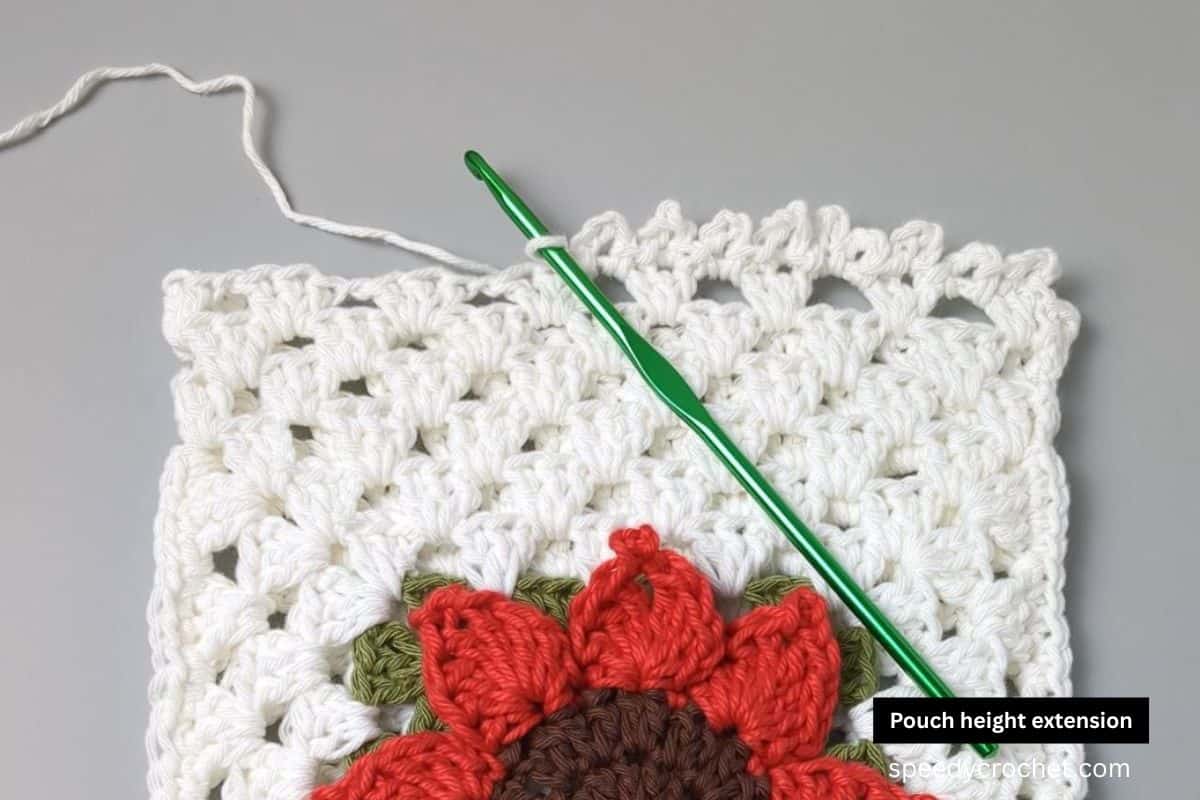
Pouch Height Extension
Rnd 1, col A - Work along the top edge and in a single layer (start with the sunflower side facing you), sl st into ch-2 sp on front of bag, ch3 (count as dc), (2dc, ch1) in same sp as ch-3, (3dc, ch1) in next 6 ch-1 sps, (3dc, ch1) in ch-2 sp on front of bag, move on to the back, (3dc, ch1) in ch-2 sp on back of bag, (3dc, ch1) in next 6 ch-1 sps, (3dc, ch1) in the last ch-2 sp on back of bag, sl st into top of ch-3 to join [48dc, 16xch1]
Rnd 2 - ch4 (count as 1dc and ch1), (3dc, ch1) in next 7-sps, (1dc, ch1) in next sp (the side seam), (3dc, ch1) in next 7-sps, sl st into 3rd ch of ch-4 to join. [44xdc, 16xch1] - use this rnd for the drawstring ties.
Rnd 3 - sl st into ch-1 sp, ch3 (count as dc), (2dc, ch1) in same sp as ch-3, (3dc, ch1) in next 15 ch-1 sps, sl st into top of ch-3 to join. [48dc, 16xch1]
Rnd 4 - ch3 (count as dc), 3dc in next 15-sps, 2dc in last sp, sl st into top of ch2 to join [48dc, 16xch1]
Rnd 5 - *sk 1-st, (sl st, ch4, sl st) in next st (the 2nd dc of the 3dc group), sk 1-st, (sl st, ch4, sl st) in next ch-1 sp, rpt from * all the way around, sl st into base of 1st , to join, cut yarn, fasten of and weave in ends.
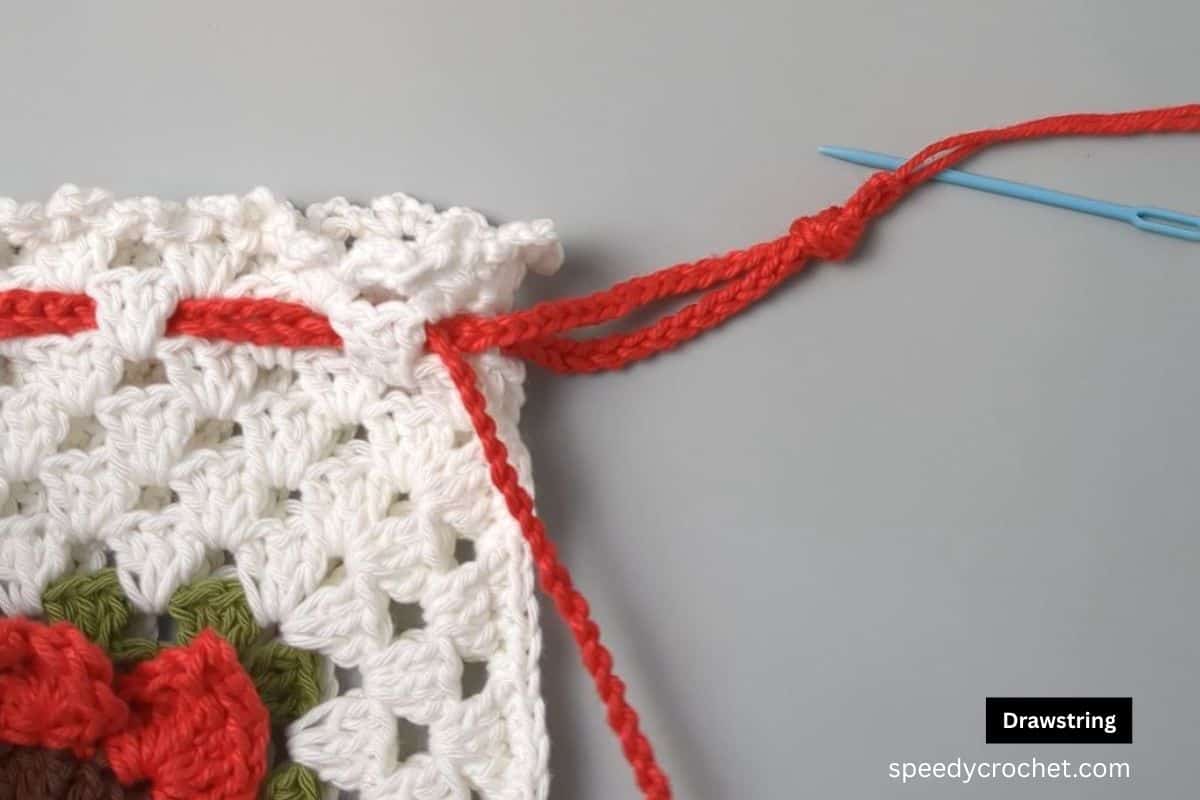
Drawstrings (make 2), col B - start with a longish yarn tail, ch 110, cut yarn, leave a longish end tail and fasten off.
Attach drawstrings to pouch:
- Take one drawstring and thread a yarn tail onto a needle.
- With pouch flower side up and starting on the right hand side, weave the needle in and out of the ch-1 spaces of round 2 of the pouch height section.
- Continue weaving in and out of the ch-1 spaces from the right hand side to the left hand side of the pouch. Then work your way around the back of the pouch until you come back to the space just before the start.
- Remove the yarn needle, match the ends of the drawstring chain wrap them around your finger to create a loop, fold the ends over and pull them though the loop to create a knot.
- Trim away the excess (the yarn tail ends) at the end of the knot.
- Then repeat the process for the second drawstring chain, this time working from the left hand side.
This sunflower crochet drawstring pouch is a fun and practical project that combines classic granny squares with a bold sunflower design.
Small, useful, and gift-ready, it’s a great choice for summer crochet, craft fairs, and handmade gifts. A bright little crochet bag that’s easy to make and easy to love.
You might also like this easy crochet mini mesh tote bag the perfect size for small gifts.
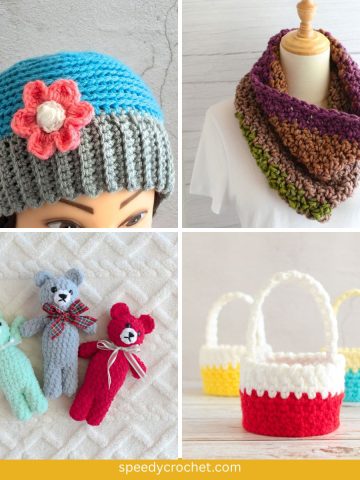
More Easy Patterns
Looking for more patterns like this? Try these:
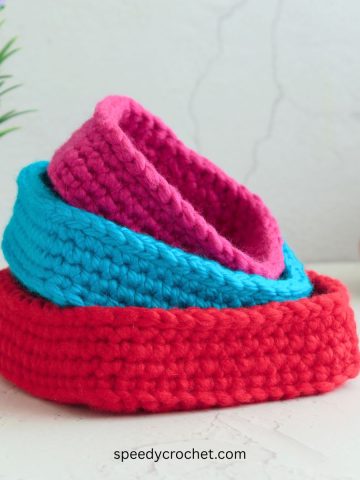
- Bramble Shell Crochet Nesting Baskets - Quick Same Day Make
- Easy Ribbed Crochet Pumpkin Pattern For Fall Decor
- Easy Crochet Mini Tote Bag Pattern (Small Gift Bag)
- Same Day Crochet Projects
If you tried this small crochet drawstring bag pattern (or any other pattern on my website), please let me know how it went in the comments below. I'd love to hear from you!
What's Next?
- Pin this post: Save this post to Pinterest so that you can come back to it later.
- Share: Share a photo on social median and tag me @speedycrochet. We would love to see your creations!
- Leave a comment: Say hello and share your feedback in the comments section below.