Create cozy fall decor with this easy ribbed crochet pumpkin pattern - simple, textured, and perfect for autumn styling.
Bring cozy autumn vibes into your home with this easy ribbed crochet pumpkin pattern - a beginner-friendly project perfect for fall decorating.
In this step-by-step tutorial, you’ll learn how to create a beautifully textured crochet pumpkin with classic ribbing that adds warmth and charm to any space.
Whether you’re making seasonal decor for your mantel, table centerpiece, or handmade gifts, this DIY crochet pumpkin pattern is quick, fun, and easy to customize with different yarns, sizes, and colors for a unique autumn look.
Table of contents
- Quick Project Details
- Pattern Overview
- Why You’ll Love This Quick Crochet Pumpkin
- Tips For The Best Ribbed Crochet Pumpkin
- Materials
- Stitches and Abbreviations - US Terms
- Gauge & Finished Size
- How To Make A Crochet Pumpkin
- ✨ You're almost there! ✨
- Ribbed Crochet Pumpkin FAQs
- Where to Use It
- A Fast Fall Favorite
- What's Next?
- Comments
Quick Project Details
- Skill level - Beginner
- Time - About 1–1.5 hours - a quick same-day crochet project
- Yarn - #4 worsted weight (cotton or acrylic)
- Hook size - 4 mm
- Stitch - Half double crochet (HDC)
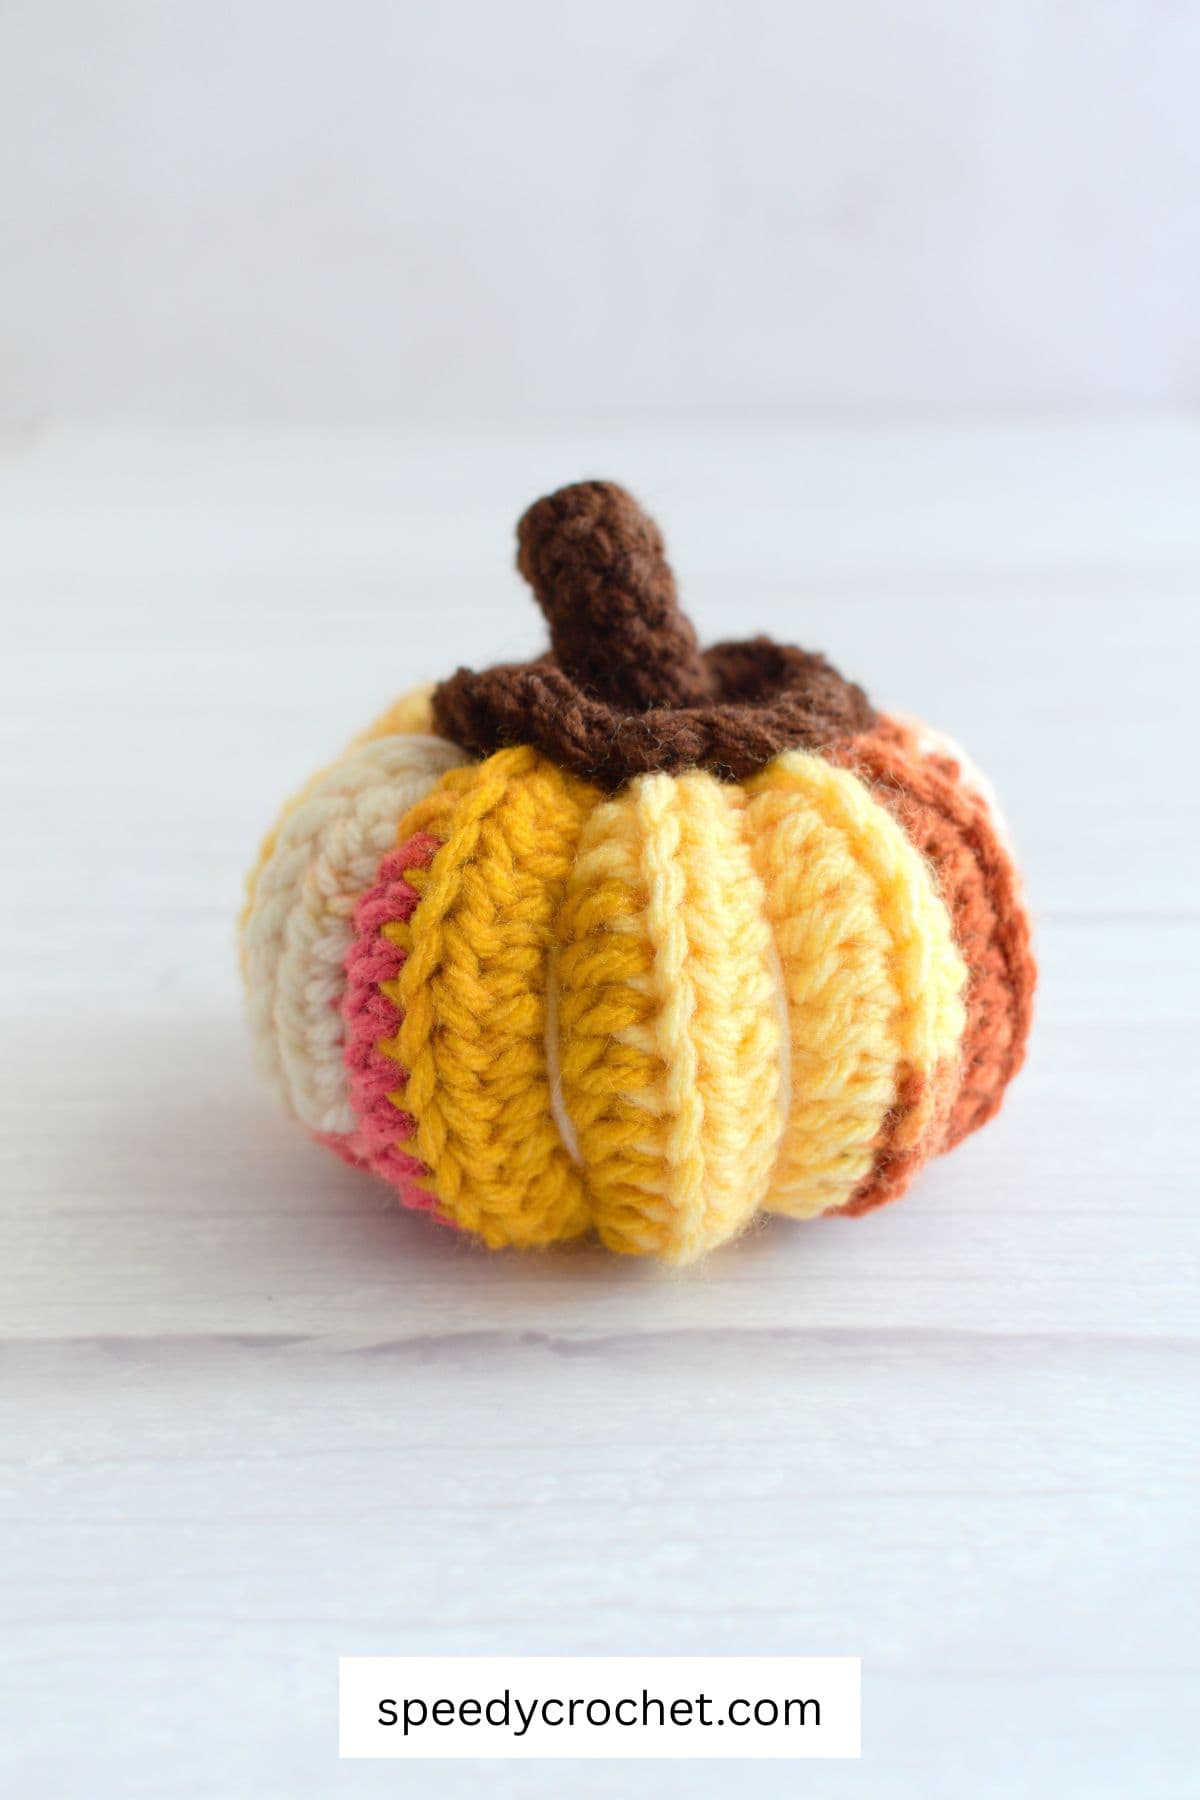
- Finished size - Approx. 4 in (10 cm) wide × 3 in (7.5 cm) tall
- Construction - Crochet a rectangle, then cinch to form pumpkin shape
- Use - Fall décor, gifts, craft markets
Pattern Overview
This ribbed crochet pumpkin pattern is a beginner-friendly crochet project for making textured fall decor without working in the round.
It is worked as a simple ribbed rectangle using half double crochet stitches, then folded and cinched at both ends to form a pumpkin shape.
The piece is stuffed and shaped to create a soft, rounded pumpkin with defined ribbing.
This is a quick, same-day crochet project that is ideal for beginners learning how to crochet a pumpkin and looking for easy handmade autumn decor.
Why You’ll Love This Quick Crochet Pumpkin
- Fast, repeatable same-day crochet project
- Perfect small crochet make for fall décor or markets
- Easy to customise with different sizes, colours, and textures
- Works well for handmade gifting or selling finished items
- Low yarn usage, making it an affordable seasonal project
Tips For The Best Ribbed Crochet Pumpkin
- Use a hook size smaller than recommended for the yarn you are using. This creates tight fabric and prevents the stuffing from coming through.
- Keep your tension slightly firm to make the ribbed texture stand out more clearly
- Count rows carefully when making the rectangle for a more even pumpkin shape
- Stuff lightly first, then adjust before fully closing to get the best rounded form
- For deeper ribbing, use consistent half double crochet placement in the front and back loops
- This is a great same-day crochet project, so consider making a small set in one sitting for coordinated fall décor
Materials
Yarn
#4 medium yarn (also known as worsted, Afghan, Aran, 10 ply) acrylic yarn with 11 WPI*
- Color B, stem - 5.5 yards (5 meters)
- Color A, pumpkin – 38 yards (35 meters)
*Wraps per inch (WPI) - measures yarn thickness by counting how many times the yarn wraps around a ruler in one inch. More wraps thinner yarn, while fewer wraps thicker yarn.
Hook Size
- 4mm
Notions
- Scissors
- Yarn Needle
- Toy stuffing
Stitches and Abbreviations - US Terms
- BLhdc – half double crochet stitches worked in the back loops
- ch – chain stitch
- col – color
- dc - double crochet
- FLO – front loop only
- hdc - half double crochet
- hk – hook
- MR – magic ring
- rnd – round
- rpt - repeat
- sc – single crochet
- sl st – slip stitch
- st/sts - stitch/stitches
- [ ] – at the end of a round indicates the number of stitches in that round
Gauge & Finished Size
Finished size about 3 inches (7.5cm) tall to top of stem and about 3.5 inches (9cm wide)
Gauge - 4x4 inch (10x10) = 16hdc and 9 row
How To Make A Crochet Pumpkin
✨ You're almost there! ✨
To unlock the final steps and complete your pattern, create a free account with Grow.me. below.
Make sure to tick the box to subscribe to our newsletter and stay up to date with the latest patterns, tips, and more!
Once you're signed up, you'll get instant access to finish your project and enjoy exclusive content in the future.
Already signed up? Hit the button below and select ‘Switch to Log In’ to pick up where you left off and finish your project!
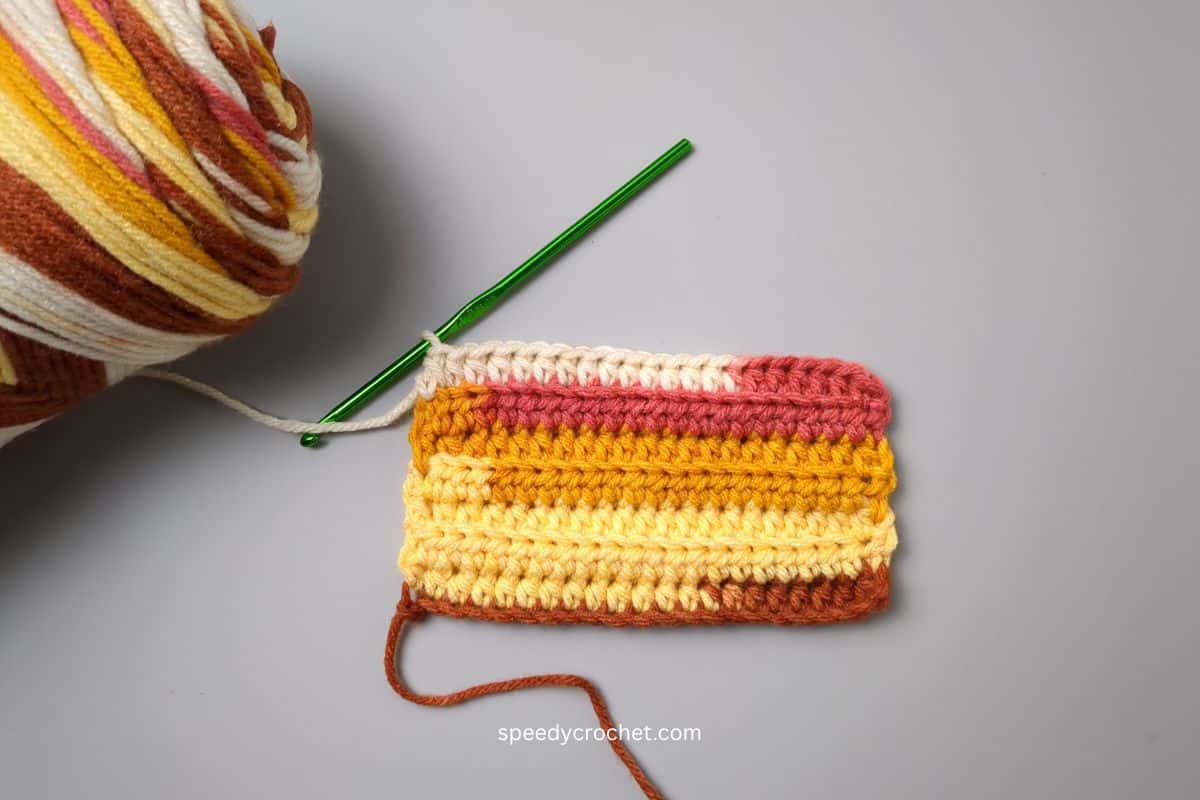
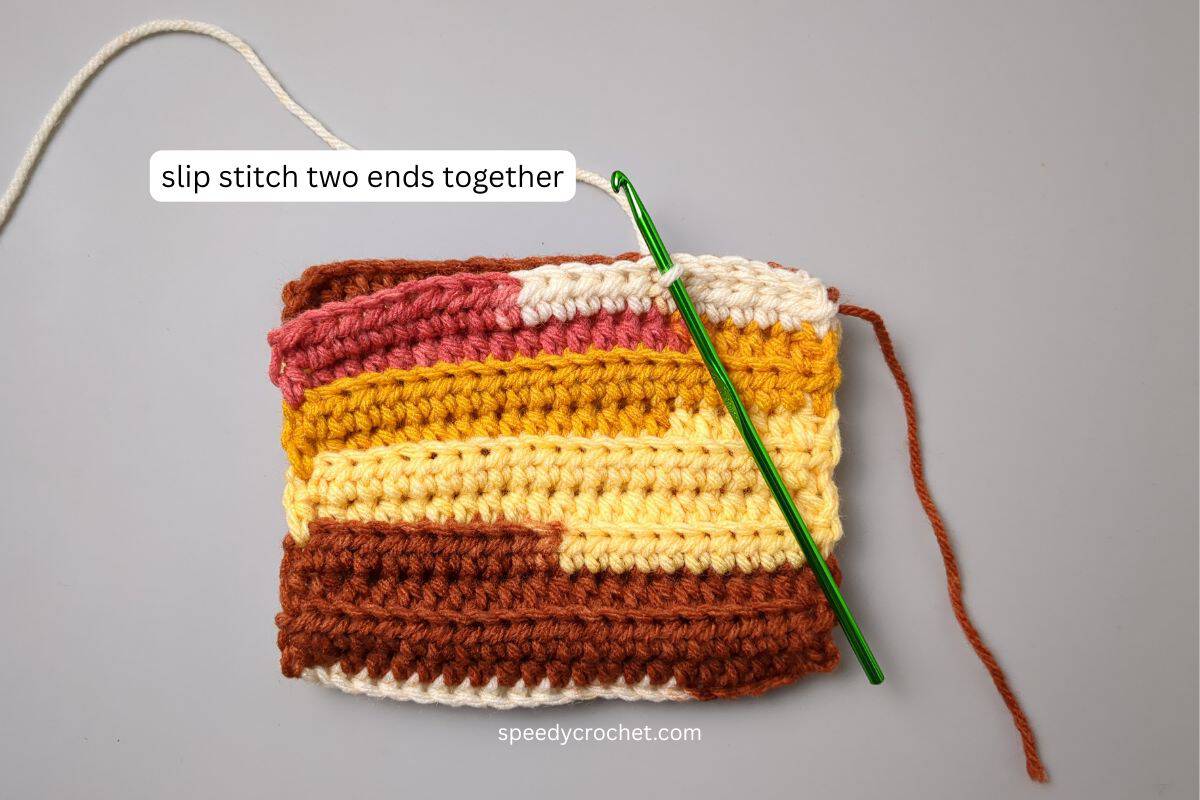
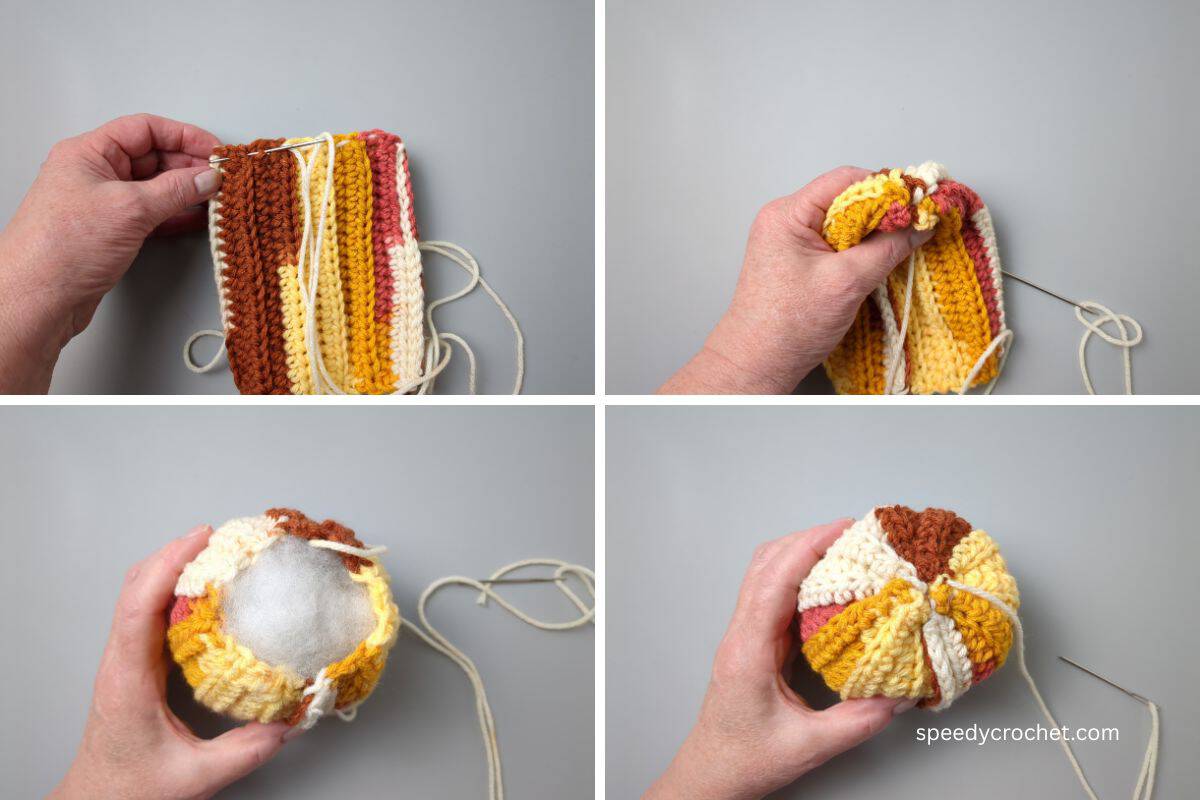
Last rnd – From the back bring the bottom edge to meet the top, working through both layers, make 20 sl sts along the edge to join the two, cut yarn, leaving at least a 1.6 yard (1.5 meter) yarn tail for sewing and shaping.
Shaping Pumpkin
- Thread the yarn tail onto a needle and weave the needle in and out of the stitches along the open edge of the piece, cinch closed and secure in end
- Insert the needle through the center of the cinched end and bring up out the other end, drawing all the yarn through.
- Lightly fill with toy stuffing.
- Then cinch and secure the other end closed. Do not cut the yarn tail, use it to create the pumpkin ribs.
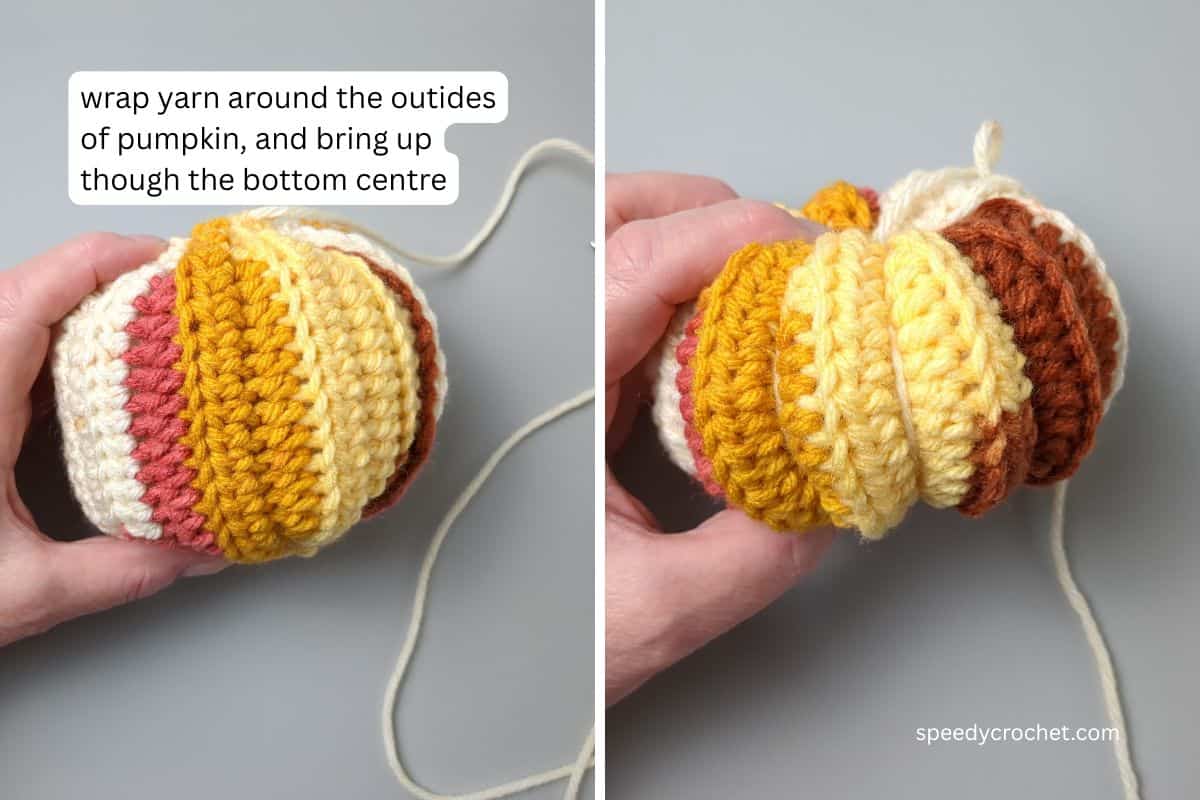
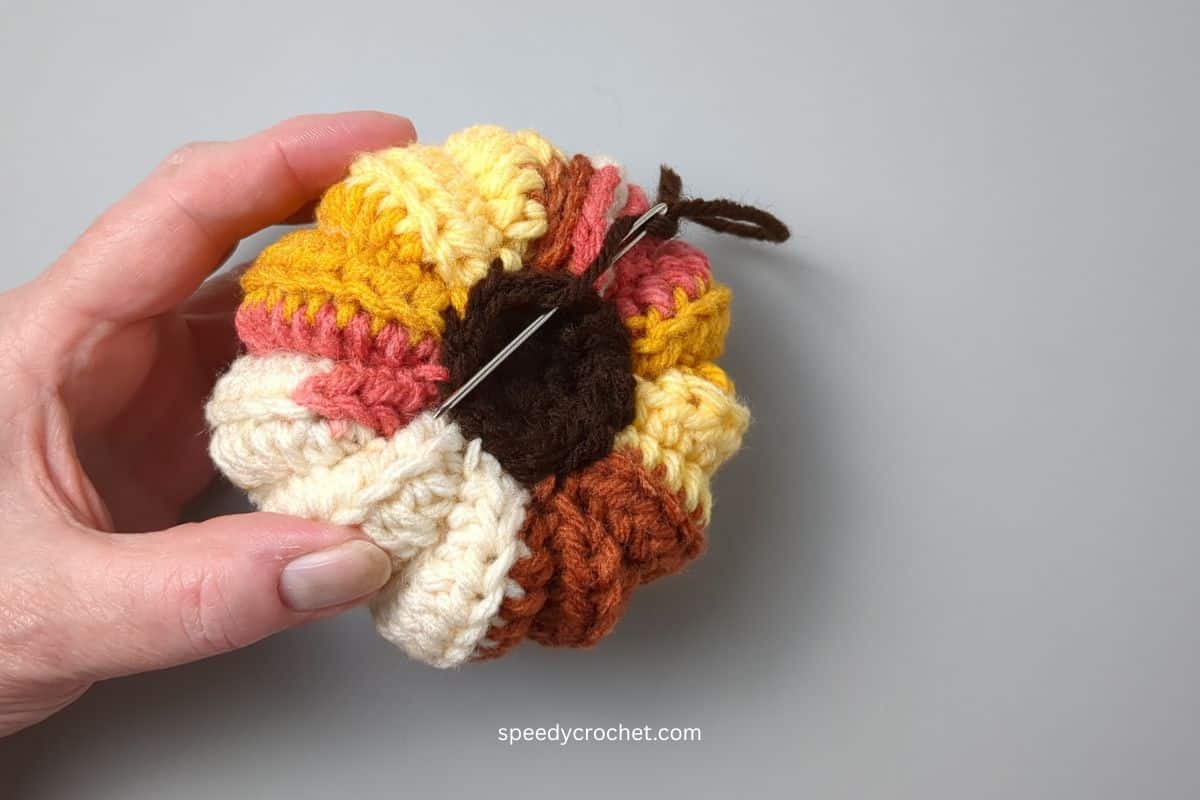
To create the pumpkin sections, follow these steps:
- Begin by inserting the needle through the bottom centre of the pumpkin and bringing it up through the top centre.
- Gently press the top and bottom of the pumpkin together with your fingers to form a small indentation in the middle. Pull the yarn tight to secure this shape.
- Next, wrap the yarn around the outside of the pumpkin and insert the needle back down through the bottom centre to the top centre again, keeping the central indentation in place.
- Pull tightly to form the first rib line along the side of the pumpkin.
- Repeat this process, sewing through the centre each time and pulling firmly to create evenly spaced rib sections.
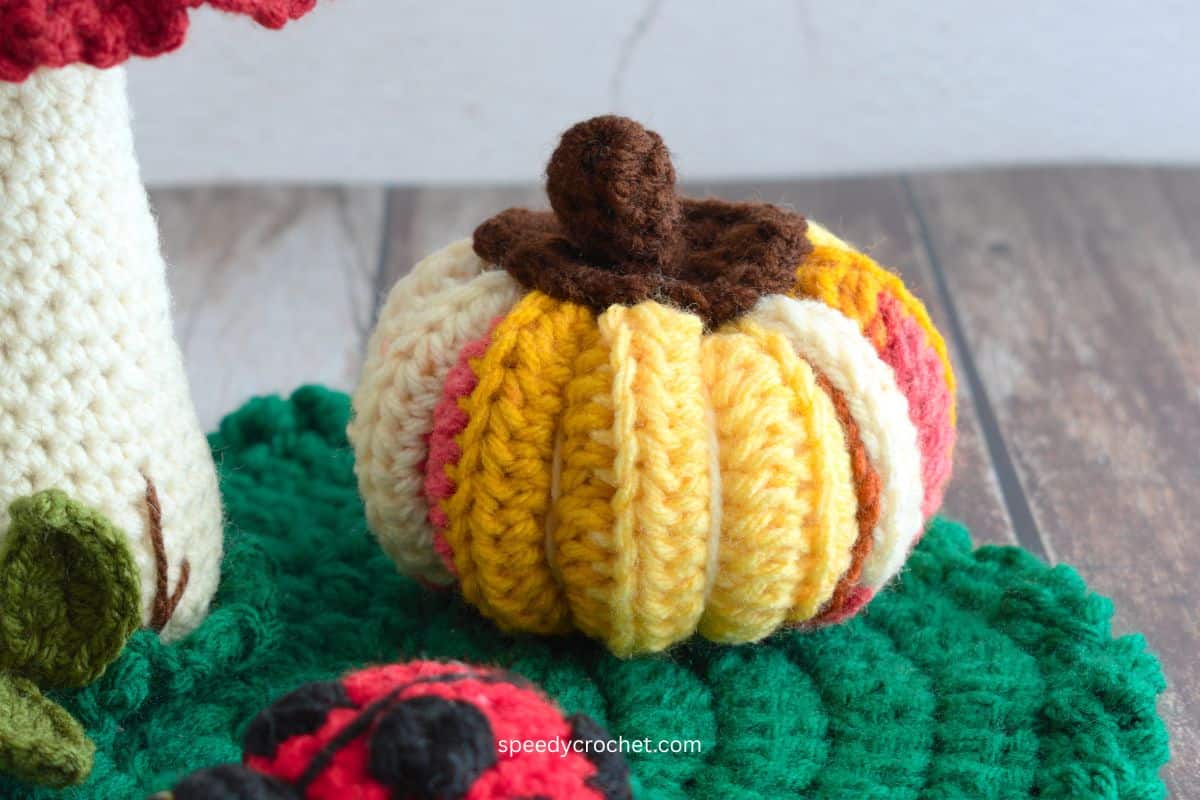
- Use the valley between the ribs as a guide to divide the pumpkin into sections. You can give your pumpkin as many sections as you like we gave ours 11.
- Once all sections are complete, secure the yarn and fasten off neatly.
- Then place the pumpkin between your hand and push into shape making the top slightly narrower than the bottom.
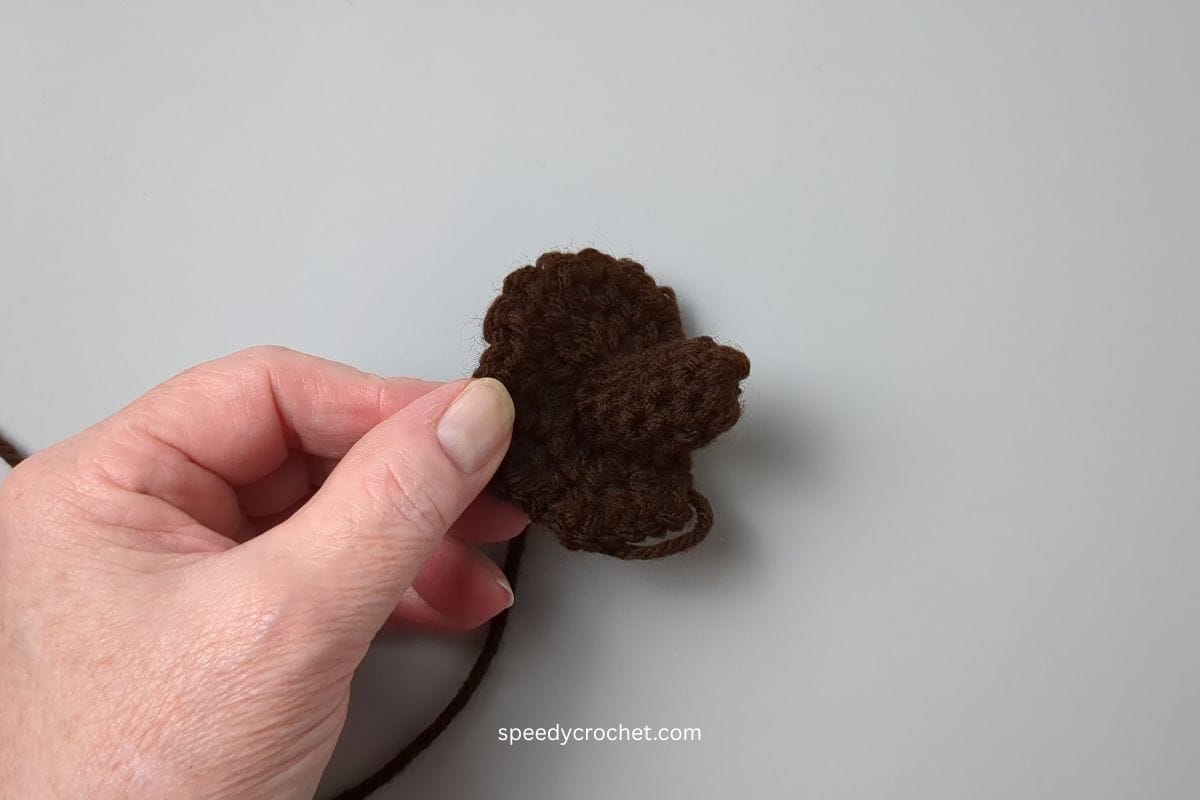
Stem
Rnd 1, col B - 8sc into MR, tighten magic ring. [8sc]
Rnds 2 - 6 - sc in each st. [8sc]
Push the yarn tail into the cavity.
Rnd 7 - 2hdc in each st, sl st into 1st st. [16hdc]
Rnd 8 (Work stiches in the FLO) - * (1sc, 1ch, 1hdc) in same st, rpt from * 16 times, then 1sl st into 1st st, cut yarn, leave a long tail for sewing, fasten off.
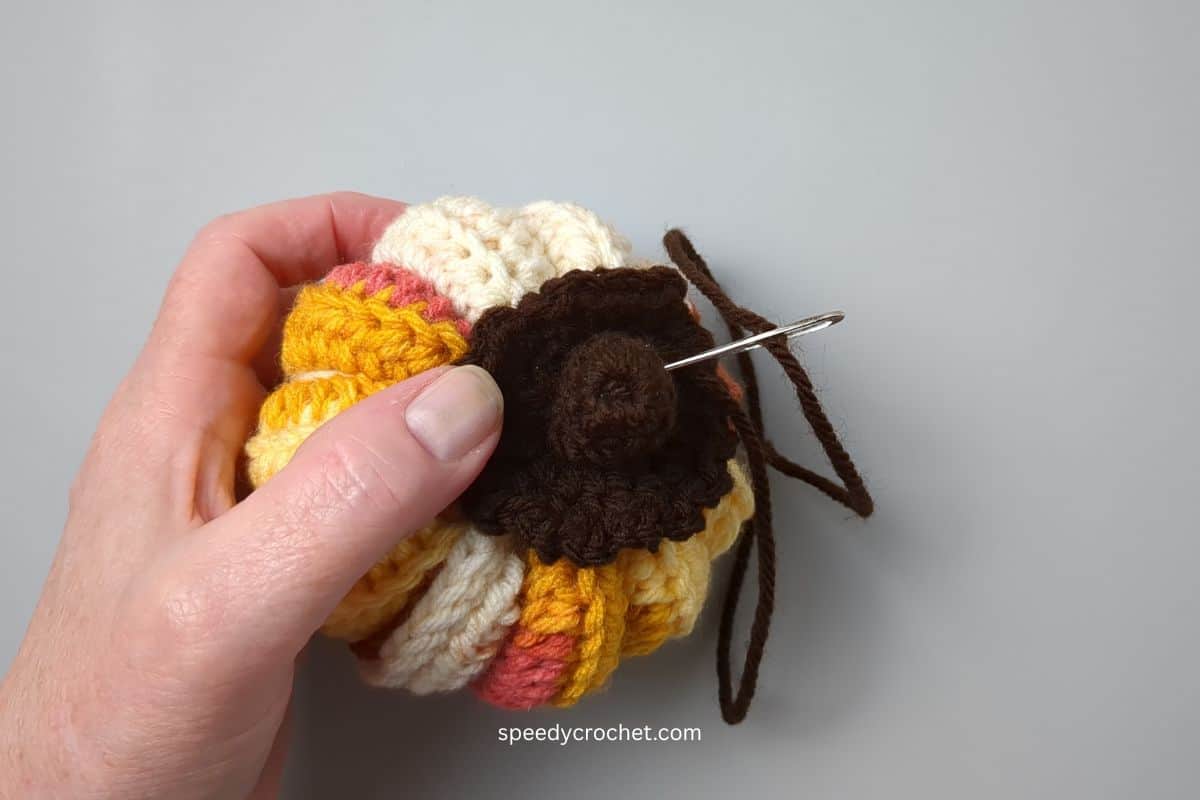
Attach Stem
- Thread yarn tail onto a needle and place the stem on the top of the pumpkin
- Push the stem down into the hollow at the top and secure in place be sewing round the stem.
Base Cover
Rnd 1, col B – 6hdc into MR, pull yarn tail tight to close the ring, sl st into 1st hdc to join. [6hdc]
Rnd 2 – ch2 (count as 1hdc), 1hdc in same sp as ch-2, 2hdc in each st, sl st into top of ch-2 to join, cut yarn, leave a long tail for sewing. [12hdc]
Attach bottom cover
- Thread the yarn tail onto a needle,
- Place circle over the cinched closer on the bottom, and sew around the outer edge, fasten off.
Ribbed Crochet Pumpkin FAQs
Yes, this is a beginner-friendly crochet pumpkin pattern. It uses simple stitches like half double crochet and basic shaping, making it ideal for confident beginners or anyone learning how to crochet a pumpkin for the first time.
This is a quick same-day crochet project that takes around 1 to 1.5 hours to complete. It’s perfect when you want a fast fall make or a small seasonal project you can finish in one sitting.
We used acrylic worsted weight yarn for this project, but you can also use other yarns such as cotton in the same weight. It’s a great stash-busting project for using up leftover yarn.
This usually happens if the pumpkin is either overfilled or underfilled with stuffing, which affects its ability to hold a balanced, rounded shape.
Can I make different sizes of this crochet pumpkin?
Yes. This pattern is very easy to scale. You can adjust the size by changing the starting chain length or repeating more rows to create larger or smaller pumpkins for a full fall display set.
This version uses a ribbed rectangle construction method instead of working in the round. This makes it quicker, easier for beginners, and ideal as a same-day crochet project with strong textured results.
Where to Use It
This crochet mini pumpkin works well in a variety of quick fall crochet décor setups around the home.
- Table centerpieces for autumn gatherings
- Shelf styling and seasonal displays
- Tiered trays and kitchen accents
- Handmade gift bundles
- Craft fair and market displays
For a coordinated seasonal look, pair it with other designs from our Woodlands Fall Crochet Collection:
- Pumpkin crochet soap saver
- Ruffle crochet table mat
- Pumpkin crochet dishcloth
These patterns are designed to work together as quick, beginner-friendly fall crochet décor projects that can be made as a matching set.
Next Pattern in the collection - bramble shell crochet nesting baskets (coming soon)
A Fast Fall Favorite
If you’re looking for a simple crochet pumpkin that’s quick to make and easy to customize, this pattern is a reliable go-to.
It works especially well for making multiple pumpkins in a short amount of time, whether for seasonal home décor, gift sets, or craft markets.
If you tried this ribbed crochet pumpkin pattern (or any other pattern on my website), please let me know how it went in the comments below. I'd love to hear from you!
What's Next?
- Pin this post: Save this post to Pinterest so that you can come back to it later.
- Share: Share a photo on social median and tag me @speedycrochet. We would love to see your creations!
- Leave a comment: Say hello and share your feedback in the comments section below.