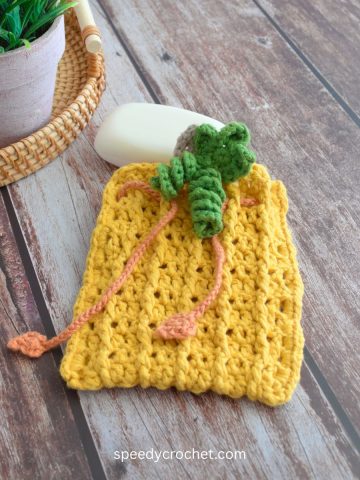
This crochet pumpkin coaster pattern is the perfect blend of cozy and creative!
Designed in the shape of a pumpkin and featuring three adorable 3D mini pumpkins along the edge, this unique coaster adds a festive touch to any table.
Whether you're decorating for fall, Thanksgiving, or even Christmas, this beginner-friendly pattern makes a charming DIY gift or seasonal home decor piece.

If you’d like even more quick crochet inspiration, you can browse the complete range of crochet coaster patterns for easy, fast makes you can finish in no time.
Table of contents
Pumpkin season isn’t just about lattes and pies—it’s also the perfect time for cozy crochet projects!
This crochet pumpkin coaster pattern is a fun and unique way to bring seasonal charm to your home.
Unlike ordinary pumpkin coasters, this one has a special twist: three adorable 3D mini pumpkins nestled along the edge, making it an eye-catching piece of table decor.
Whether you're setting the table for Thanksgiving, adding a handmade touch to your fall decorations, or looking for a thoughtful DIY gift, this pattern is just what you need.
Crochet coasters are one of the best beginner-friendly projects because they work up quickly and let you experiment with different colors and textures.
This design is simple yet full of character, making it a great addition to any autumn-inspired craft collection.
You can keep things classic with warm pumpkin tones or switch up the colors for a wintery Christmas version.
One of the best things about this pattern is its versatility. Use these coasters as part of your fall tablescape, stack them up for a cozy display, or gift them to friends who love all things handmade.
They are the kind of small project that brings big joy - both in the making and the using!
Ready to add a touch of pumpkin magic to your home? Let’s get started on this fun crochet coaster!
Why You'll Love This Pattern
Unique Design: The 3D mini pumpkins make this coaster stand out from traditional crochet pumpkin coasters.
Beginner-Friendly: Simple stitches and easy shaping make this a great project for all skill levels.
Perfect for Fall & Winter: Whether for Thanksgiving, Christmas, or just cozy home decor, this coaster fits right in.
Great for Gifts: These handmade coasters make thoughtful DIY gifts for friends and family.
Quick & Fun: A fast project that lets you create something cute and practical in no time.
Seasonal Home Decor: Add a handmade touch to your dining table, coffee table, or desk with this festive piece.
Things To Note:
- To make the base of crochet pumpkin coasters we used double strands of #2 fine cotton yarn (with about 18 wraps per inch) for the pumpkin coaster base. You could also use #4 worsted weight yarn with about 11 wraps per inch, something like red heart super saver yarn.
- We used #3 light (12 wraps per inch) yarn to make the mini pumpkin coasters.
- In this pattern, we used two different-sized hooks. The sizes are as follows:
- We used a 3.75mm hook to make the large pumpkin coaster base and its stem, We also used the 4mm hook to wrap the yarn around the hook to form the mini pumpkins.
- A 3mm hook was used to create a tighter stitch for the stems and tendrils and to draw the tops of the mini pumpkin together.
- When making the mini pumpkins, try to draw all the loops up to an even height, and avoid having the stitches too tight on the hook because it will make it difficult to draw the hook through all the loops to finish the stitch.

Materials You will Need
Yarn
To make one coaster you will need:
Coaster base - #2 fine (sport, baby, 5ply) weight yarn with about 18 wraps per inch (WPI)*
- Color A – coaster (orange) - 40.5 yards (37 meters) divide into two and crochet two strands together
- Color B – stem (dark grey) - 5 yards (4.6 meters) divide into two and crochet two strands together
Mini pumpkins - #3 light (DK, light worsted, 8ply) yarn with about 12 wraps per inch (WPI)*
- Color C – mini pumpkin 1 (pink) - 3.2 yards (3 meters)
- Color D – mini pumpkin 2 (red) - 3.2 yards (3 meters)
- Color E – mini pumpkin 3 (yellow) - 3.2 yards (3 meters)
- Color F – mini pumpkin top, stem, and tendril, (olive green) - 2 yards (2 meters)
- Color G – tendril for coaster, (green) - 1 yard (1 meter)
*Wraps per inch (WPI) - measures yarn thickness by counting how many times the yarn wraps around a ruler in one inch. More wraps thinner yarn, while fewer wraps thicker yarn.
Hook Size
- 3.75 mm
- 3 mm
Notions
- Scissors
- Yarn Needle
Finished Size
The finished size of the pumpkin coaster pattern is about 5 inches (12.5 cm) wide and about 4 inches (10 cm) high (not including the stem).

Gauge
Rounds 1 and 2 of the pattern should measure about 2.25 inches (5.7 cm) in diameter.
Stitches and Abbreviations Used - US Terms
- MR - magic ring
- ch- chain stitch
- sc - single crochet
- dc - double crochet
- hdc - half double crochet
- tr - treble stitch
- col - color
- puff - puff (see special stitches below)
- st/sts - stitch/stitches
- sl st - slip stitch
- sk – skip
- rnd - round
- rpt - repeat
- hk - hook
- YO - yarn over hook
- lp/lps - loop/loops
- [ ] - at the end of a round indicates the number of stitches in that round
Special Stitches
Puff Stitch (puff)
- A puff stitch is several loops pulled up in one stitch. The number of loops for a puff stitch can vary, patterns will have puffs made with as few as four loops or ten or more.
- Yarn over hook (YO) and insert the hook into a stitch.
- Yarn over the hook (YO), and pull the yarn back up through the stitch. You will have three loops on the hook.
- Yarn over the hook (YO), and insert hook back into the same stitch, yarn over hook (YO), and pull yarn through the stitch., You will have five loops on the hook.
- Yarn over the hook (YO), insert hook back into the same stitch, yarn over hook (YO), and pull yarn through the stitch. You will have seven loops on the hook.
- Yarn over the hook (YO), insert hook back into the same stitch, yarn over hook (YO), and pull yarn through the stitch. You will have nine loops on the hook.
- Yarn over the hook (YO), pull through all seven loops, and chain 1 to secure the puff stitch.
- This completes a 9-loop puff stitch.
Abbreviated version
Puff - YO, insert hk into st, YO, pull yarn through st (3 lps on hk), YO, insert hk in the same stitch, YO, pull up lp (5 lps on hk), YO, insert hk in same st, YO, pull up lp (7 lps on hk), YO, pull up lp (9 lps on hk), YO and pull through all lps on hk, ch1.
Instructions
Coaster
Foundation, col A, 3.75mm hk - MR, or ch3, sl st into 1st st to make a ring.

Rnd 1 - Ch2 (not counted as st), 15dc in ring, sl st into 1st dc to join. [15dc]

Rnd 2 - Ch2 (not counted as a st), 2dc in same sp as ch-2, 2dc in each st, sl st into 1st dc to join. [30dc]

Rnd 3 - Ch2 (not counted as a st), 2dc in same sp as ch-2, *1dc in next st, 2dc in next st, rpt from * to the end, sl st into top of 1st dc to join. [45dc]

Rnd 4 - Sl l st in next st, hdc in next, 1dc in each of the next 5-sts, 1tr in next 2-sts, 2tr in next, 1tr in next 2-sts, 1 dc in each of the next 6-sts, 2hdc in next st, 1sc, sl st into each of the next 5-sts, 1sc, 2hdc in next st, 1dc in each of the next 6-sts, 1tr in next 2-sts, 2tr in next, 1tr in next 2-sts, 1dc in next 5-sts, 1hdc in next st, 1sc, sl st into next 2-sts, sl st into next st to join [49 stitches]

Rnd 5 - sl st into next 2-sts, 1sc in next st, * ch7, sk 4-sts, 1sc in next st, rpt from * one more time, 2sc in next st, 1sc in next 6-sts, sl st in next 6-sts, 1sc in next 7-sts, 2sc in next st, 1 sc in next 5-sts, ch7, sk 4-sts, 1sc in next 3sts, sl st in next 3-sts, sl st into 1st to join, ch1, cut yarn and fasten off, and weave in ends.
Stem

Rnd 1, col B, 3.75mm hk - Slip knot yarn to hook and sl st yarn into the last stitch made in round 5.
Sc in next st, ch7, hdc in 2nd ch from hk, hdc in next st, 3hdc in next st, 1hdc in next 3-sts, hdc on top of sc, then sl st into the base of sc, ch1, cut yarn and fasten off, and weave in ends.
Mini Pumpkins
Mini pumpkin 1, place this into the ch-7 space on the right-hand side of the coaster.

Rnd 1, col C, 3.75mm hk - Slip knot yarn to hook, and slip stitch yarn into ch-7 sp, ch3 (not counted as a st), make 7 puffs into ch-7 sp, after making the last puff st, cut yarn, fasten off, and weave in ends. [7 puffs]

Rnd 2, top, stem and tendril, col F, 3mm hk - Slip knot yarn to hk and sl st yarn into the top of the ch-3 of the 1st puff, insert hk into the sts across the puffs pulling up loops as you go until you have 9-10 loops on the hk, YO hk and pull through all loops on the hook, ch9, 2sc in 2nd ch from hk, 2sc in next 7-sts, sl st into the top of the pumpkin, ch3, 1sc in 2-st from hk, 1sc in next st, sl st into the top of the pumpkin, ch1 cut yarn and fasten off, and weave in ends.
Mini pumpkins 2 & 3
Rnd 1, two pumpkins on the left, 3.75mm hk - Follow the instructions in rnd 1 of mini pumpkin 1 above. And make two mini pumpkins one in col D, and one in col E, working each of the remaining two ch-7 spaces.

Rnd 2, tops, stems and tendrils, col F, 3mm hk - Slip knot yarn to hk and sl st yarn into the top of the 1st puff, insert hk into the sts across the puffs pulling up loops as you go until you have 9-10 lps on the hk, YO hk and pull through all lps on the hk, ch9, 2sc in 2nd ch from hk, 2sc in next 7-sts, sl st into the top of the pumpkin, ch3, 1sc in 2nd ch from hk, 1sc in next st, sl st into the top of the pumpkin, ch4, sl st into sc on the coaster between the mini pumpkins, ch2, sl st into top of 1st puff of the 2nd pumpkin and pick up 9-10 lps across the top as before, YO hk and pull through all lps on the hk, ch9, 2sc in 2nd ch from hk, 2sc in next 8-sts, sl st into the top of the pumpkin, ch3, 1sc in 2nd ch from hk, 1sc in next st, sl st into the top of the 2nd mini pumpkin, ch1, cut yarn, fasten off and weave in ends.
Tendril For Coaster

Rnd 1, col G, 3 mm hk - Ch12, 2sc in 2nd ch from hk, 2sc in next 10-sts, ch1, cut yarn, leaving a long yarn tail for sewing.
Attach tendril - Thread the yarn tail onto a needle, sew the tendril to the base of the stem on the coaster, and weave in ends.
Finishing
Use your fingers to shape and push the mini pumpkins so that they sit upright on the coaster.

Tips
Use Sturdy Yarn: A durable cotton or cotton blend yarn works best for coasters to keep them from stretching out.
Block Your Coaster: Lightly blocking your finished piece will help it lay flat and hold its shape.
Secure the 3D Pumpkins Well: Make sure to firmly attach the mini pumpkins so they stay in place with repeated use.
Variations/Color Schemes/Ideas
Classic Pumpkin Tones: Use traditional orange for the coaster, with green stems and brown accents for a realistic look.
Christmas Version: Make a wintery take with white or deep red pumpkins for a festive holiday table setting.
Rustic Vibes: Try using earthy tones like mustard yellow, deep brown, or burnt orange for a farmhouse-inspired coaster.
Pastel Pumpkins: Create a softer look with light pink, baby blue, or lavender for a modern fall aesthetic.
Make a Set: Crochet a matching set in different colors to use throughout the season or gift as a bundle.
More Easy Crochet Patterns
If you like these crochet pumpkin coasters, you might also like our crochet pumpkin slice coaster pattern. It is a fun and easy project for fall. Or see our 1 hour crochet projects for more fun ideas or this collection of easy crochet coasters.
If you tried this crochet pumpkin coaster pattern (or any other pattern on my website), please let me know how it went in the comments below. I'd love to hear from you!
What's Next
- Pin this post: Save this post to Pinterest so that you can come back to it later.
- Share: Share a photo on social median and tag me @speedycrochet. We would love to see your creations!
- Leave a comment: Say hello and share your feedback in the comments section below.